flutter firebase을 이용한 구글 인증으로 회원관리
0. 조건 - firebase 구글 인증이 허용되어 있어야 하며 어플과 연동되어 있어야 한다.
1. 목표
firebase을 통해 구글을 연동하여 회원 관리를 구현한다.
회원 가입 및 로그인 인증 후 다른 화면을 볼 수 있도록 구현한다.
로그아웃 구현 역시 동일한 방식으로 구현한다.
2. 구현 내용 및 설명
main.dart
import 'package:firebase_auth/firebase_auth.dart';
import 'package:google_sign_in/google_sign_in.dart';
먼저 firebase와 goole인증 라이브러리를 임포트 해주어야 한다.
class AppState{
  bool loading;
  FirebaseUser user;
  AppState(this.loading, this.user);
}
AppState을 클래스를 사용해 user와 loading을 사용할 수 있도록 선언한다.
class _MyHomePageState extends State<MyHomePage> {

  final FirebaseAuth _auth = FirebaseAuth.instance;
  final GoogleSignIn _googleSignIn = GoogleSignIn();
  final app = AppState(false, null);
state 클래스 안에 Firebase인증과 GoogleSignIn을 선언해 인증을 사용할 수 있도록 하고 app으로 Appstate을 접근할 수 있도록 한다. AppState의 loading을 false로 user은 아직 인증하기 전임으로 null을 초기화 해준다.
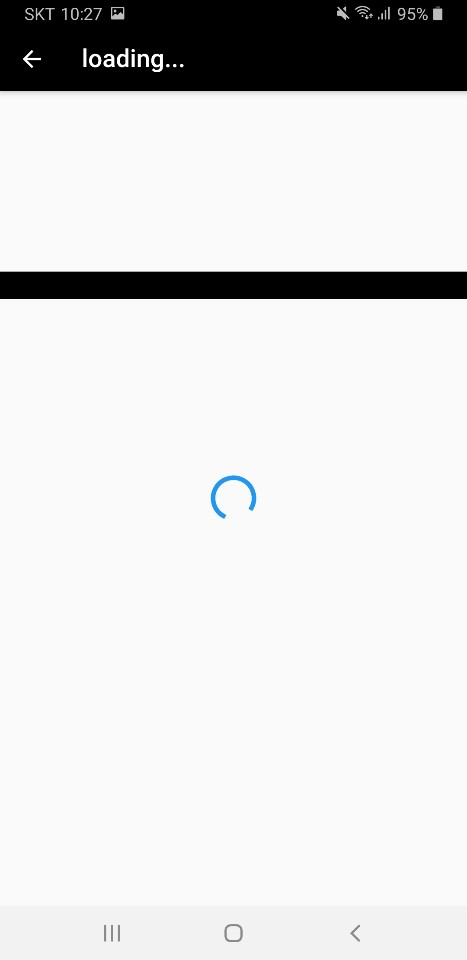
Widget _loading(){
    return Scaffold(
      appBar: AppBar(title : Text("loading...")),
      body : Center(child: CircularProgressIndicator())
    );
로딩화면을 만들어 주는 로딩 위젯 함수이다. 이렇게 선언하면 좋은 점이 계속해서 로딩 위젯을 생성할 필요 없이 클래스 객체를 통해 True/False만 전달해 주고 loading위젯만 호출 하면 되기 때문에 코딩의 가용성이 매우 증가한다.
 @override
  Widget build(BuildContext context) {
    if(app.loading) return _loading();

    return main();
  }
다음과 같이 로딩 화면을 구현하기 위해 한줄의 코딩만 있으면 된다.
drawer: Drawer(
        child: ListView(
          padding: EdgeInsets.zero,
          children: <Widget>[
            //로그인 회원가입 창
            if(app.user == null) Login_SignUp()
            else Login_done(),
user == null 일때 Login_SignUp() 위젯 함수를 호출합니다. 앞으로 user에 따라 인증을 확인할 것입니다.
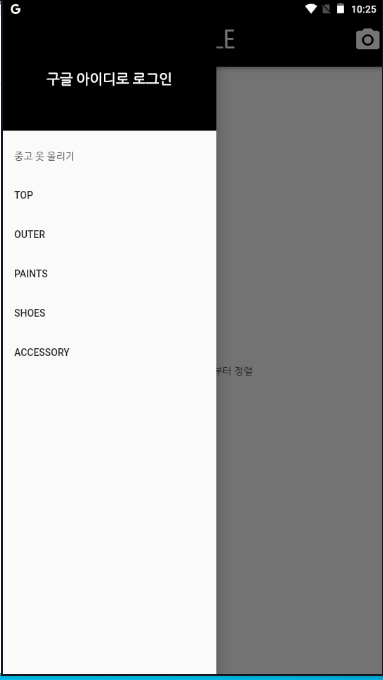
Widget Login_SignUp() {
    return new DrawerHeader(
      child: Column(
        mainAxisAlignment: MainAxisAlignment.center,
        children: <Widget>[
          FlatButton(
            child: Text(
              '구글 아이디로 로그인',
              style: TextStyle(
                height: 1.5,
                fontWeight: FontWeight.bold,
                fontSize: 20,
                //fontFamily: 'Nanum Myeongjo',
                fontStyle: FontStyle.normal,
                color: Colors.white,
              ),
            ),
            onPressed: () async {
              _signIn();
            },
          ),
        ],
      ),
      decoration: BoxDecoration(
        color: Colors.black,
      ),
    );
  }
이 부분은 화면에 그냥 구글 아이디로 로그인 화면을 보여주는 구현 부분이다. 중요한 것은 onPressed : () async {} 클릭하면 수행되는 _signIn() 함수가 호출되는 부분이 중요하다.
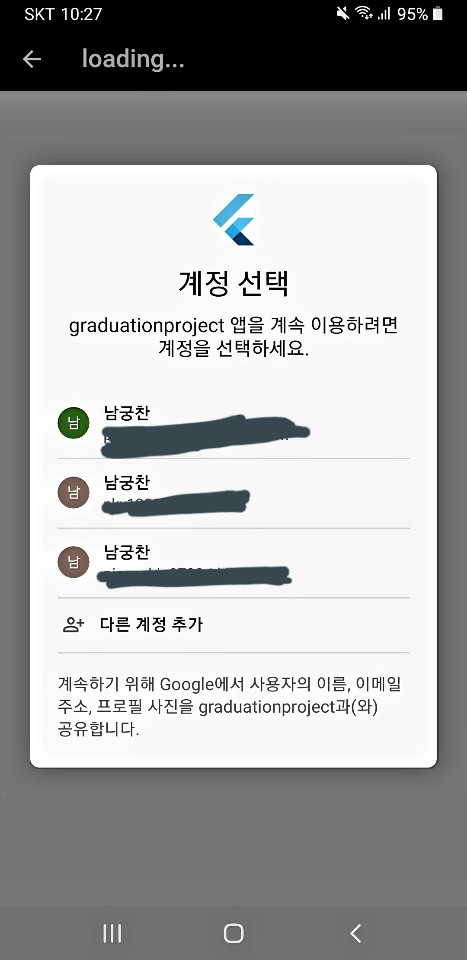
Future<String> _signIn() async{
    setState(() => app.loading = true);
    final GoogleSignInAccount googleUser = await _googleSignIn.signIn();
    final GoogleSignInAuthentication googleAuth =
    await googleUser.authentication;
    final AuthCredential credential = GoogleAuthProvider.getCredential(
        accessToken: googleAuth.accessToken,
        idToken: googleAuth.idToken,
    );
    final AuthResult awitAsult = await _auth.signInWithCredential(credential);
    final FirebaseUser user = awitAsult.user;

    setState(() {
      app.loading = false;
      app.user = user;
      print(user);
    });

    return 'successor';
  }
Futer, await, async 등 어려운 글자들이 보인다. 정확하게 이 인증 코드를 이해하기 위해서는 Futer의 동기/비동기를 알아야 한다. 다음에 기회가 되면 asynchronism에 대해 글을 남기도록 하겠다. 적당히 인증을 하기 위해 필요한 코드이고 맨위에 setState()는 시작할 때 app.loading을 true로 주어서 로딩 화면을 구현하고 인증이 끝나면 app.loading을 false로 초기화 해주고 user도 초기화해서 인증 여부를 알게 해준다.
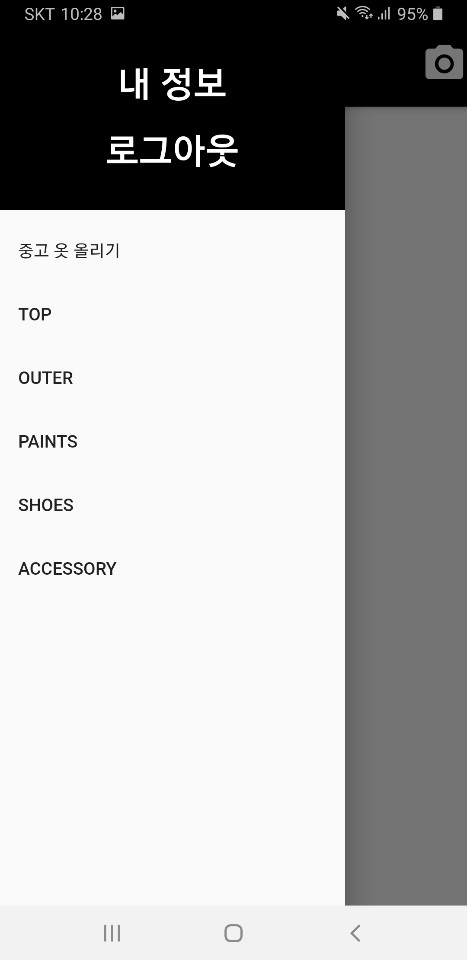
 Widget Login_done(){
    return new DrawerHeader(
        child: Column(
          mainAxisAlignment: MainAxisAlignment.center,
          children: <Widget>[
            FlatButton(
              child: Text(
                '내 정보',
                style: TextStyle(
                  height: 0.5,
                  fontWeight: FontWeight.bold,
                  fontSize: 30,
                  //fontFamily: 'Nanum Myeongjo',
                  fontStyle: FontStyle.normal,
                  color: Colors.white,
                ),
              ),
              onPressed: () async {
                  final result = await Navigator.pushNamed(context, '/My_information');
              },
            ),
            SizedBox(
              height: 10,
            ),
            FlatButton(
              child: Text(
                '로그아웃',
                style: TextStyle(
                  height: 0.5,
                  fontWeight: FontWeight.bold,
                  fontSize: 30,
                  //fontFamily: 'Nanum Myeongjo',
                  fontStyle: FontStyle.normal,
                  color: Colors.white,
                ),
              ),
              onPressed: (){
                _sign_Out();
              }
              ),
          ],
        ),
              decoration: BoxDecoration(
    color: Colors.black,
              ),
    );
  }
간단한 코드이다. 내 정보를 클릭하면 내 정보 페이지로 이동할 수 있도록 하고 로그 아웃 클릭하면 _sign_Out()함수를 호춯한다. 내 정보 코드는 아직 구현하지 않았다.
_sign_Out() async{
    await _googleSignIn.signOut();
    setState(() {
      return app.user = null;
    });
  }
_sing_Out() 함수이다. 이 함수를 호출하면 로그 아웃이 되며 app.user을 null로 다시 초기화 해준다.
3. 전체 소스 코드
import 'package:flutter/material.dart';
import 'package:graduationproject/My_Page.dart';
import 'package:graduationproject/data/JoinOrLogin.dart';
import 'package:provider/provider.dart';
import 'package:firebase_auth/firebase_auth.dart';
import 'package:google_sign_in/google_sign_in.dart';


void main() => runApp(MyApp());

class MyApp extends StatelessWidget {

  // This widget is the root of your application.
  @override
  Widget build(BuildContext context) {
    return MaterialApp(
      debugShowCheckedModeBanner: false,
      //우측 상단 debug 제거

      title: 'Flutter Demo',
      theme: ThemeData(
        primaryColor: Colors.black,
      ),

      //provider Join
      home: MyHomePage(),
      //라우터로 인한 화면 이동
      routes: {
        '/My_information' : (context) => My_infromation()
      },
    );
  }
}

class MyHomePage extends StatefulWidget {
  // This widget is the home page of your application. It is stateful, meaning
  // that it has a State object (defined below) that contains fields that affect
  // how it looks.

  // This class is the configuration for the state. It holds the values (in this
  // case the title) provided by the parent (in this case the App widget) and
  // used by the build method of the State. Fields in a Widget subclass are
  // always marked "final".

  @override
  _MyHomePageState createState() => _MyHomePageState();
}

class AppState{
  bool loading;
  FirebaseUser user;
  AppState(this.loading, this.user);
}

class _MyHomePageState extends State<MyHomePage> {

  final FirebaseAuth _auth = FirebaseAuth.instance;
  final GoogleSignIn _googleSignIn = GoogleSignIn();
  final app = AppState(false, null);

  @override
  Widget build(BuildContext context) {
    if(app.loading) return _loading();
    //if(app.user == null) return _signIn();
    // This method is rerun every time setState is called, for instance as done
    // by the _incrementCounter method above.
    //
    // The Flutter framework has been optimized to make rerunning build methods
    // fast, so that you can just rebuild anything that needs updating rather
    // than having to individually change instances of widgets.
    return main();
  }

  Widget _loading(){
    return Scaffold(
      appBar: AppBar(title : Text("loading...")),
      body : Center(child: CircularProgressIndicator())
    );
  }

  Widget main(){
    return Scaffold(
      appBar: PreferredSize(
        preferredSize: Size.fromHeight(70.0),
        child: AppBar(
          // Here we take the value from the MyHomePage object that was created by
          // the App.build method, and use it to set our appbar title.
          title: Column(
            mainAxisAlignment: MainAxisAlignment.center,
            crossAxisAlignment: CrossAxisAlignment.center,
            children: <Widget>[
              Center(
                child: Text(
                  'C-STYLE',
                  style: TextStyle(
                      height: 1.5,
                      fontWeight: FontWeight.bold,
                      fontSize: 35,
                      fontFamily: 'Nanum Barumpen',
                      //나눔 글꼴
                      fontStyle: FontStyle.normal),
                ),
              ),
            ],
          ),
          actions: <Widget>[
            Column(
              mainAxisAlignment: MainAxisAlignment.center,
              crossAxisAlignment: CrossAxisAlignment.center,
              children: <Widget>[
                IconButton(
                  icon: Icon(
                    Icons.camera_alt,
                    color: Colors.white,
                    size: 40,
                  ),
                ),
              ],
            )
          ],
        ),
      ),

      body: Center(
        child: Text('가장 최근에 올린 옷부터 정렬'),
      ),

      //슬라이드 메뉴
      drawer: Drawer(
        child: ListView(
          padding: EdgeInsets.zero,
          children: <Widget>[
            //로그인 회원가입 창
            if(app.user == null) Login_SignUp()
            else Login_done(),
            ListTile(
                title: Text('중고 옷 올리기'),
                onTap: () {
                  Navigator.pop(context);
                }),
            ListTile(
              title: Text('TOP'),
              onTap: () {
                Navigator.pop(context);
              },
            ),
            ListTile(
              title: Text('OUTER'),
              onTap: () {
                Navigator.pop(context);
              },
            ),
            ListTile(
              title: Text('PAINTS'),
              onTap: () {
                Navigator.pop(context);
              },
            ),
            ListTile(
              title: Text('SHOES'),
              onTap: () {
                Navigator.pop(context);
              },
            ),
            ListTile(
              title: Text('ACCESSORY'),
              onTap: () {
                Navigator.pop(context);
              },
            ),
          ],
        ),
      ),
      // This trailing comma makes auto-formatting nicer for build methods.
    );
  }

  Widget Login_done(){
    return new DrawerHeader(
        child: Column(
          mainAxisAlignment: MainAxisAlignment.center,
          children: <Widget>[
            FlatButton(
              child: Text(
                '내 정보',
                style: TextStyle(
                  height: 0.5,
                  fontWeight: FontWeight.bold,
                  fontSize: 30,
                  //fontFamily: 'Nanum Myeongjo',
                  fontStyle: FontStyle.normal,
                  color: Colors.white,
                ),
              ),
              onPressed: () async {
                  final result = await Navigator.pushNamed(context, '/My_information');
              },
            ),
            SizedBox(
              height: 10,
            ),
            FlatButton(
              child: Text(
                '로그아웃',
                style: TextStyle(
                  height: 0.5,
                  fontWeight: FontWeight.bold,
                  fontSize: 30,
                  //fontFamily: 'Nanum Myeongjo',
                  fontStyle: FontStyle.normal,
                  color: Colors.white,
                ),
              ),
              onPressed: (){
                _sign_Out();
              }
              ),
          ],
        ),
              decoration: BoxDecoration(
    color: Colors.black,
              ),
    );
  }

  Widget Login_SignUp() {
    return new DrawerHeader(
      child: Column(
        mainAxisAlignment: MainAxisAlignment.center,
        children: <Widget>[
          FlatButton(
            child: Text(
              '구글 아이디로 로그인',
              style: TextStyle(
                height: 1.5,
                fontWeight: FontWeight.bold,
                fontSize: 20,
                //fontFamily: 'Nanum Myeongjo',
                fontStyle: FontStyle.normal,
                color: Colors.white,
              ),
            ),
            onPressed: () async {
              _signIn();
            },
          ),
        ],
      ),
      decoration: BoxDecoration(
        color: Colors.black,
      ),
    );
  }

  Future<String> _signIn() async{
    setState(() => app.loading = true);
    final GoogleSignInAccount googleUser = await _googleSignIn.signIn();
    final GoogleSignInAuthentication googleAuth =
    await googleUser.authentication;
    final AuthCredential credential = GoogleAuthProvider.getCredential(
        accessToken: googleAuth.accessToken,
        idToken: googleAuth.idToken,
    );
    final AuthResult awitAsult = await _auth.signInWithCredential(credential);
    final FirebaseUser user = awitAsult.user;

    setState(() {
      app.loading = false;
      app.user = user;
      print(user);
    });

    return 'successor';
  }

  _sign_Out() async{
    await _googleSignIn.signOut();
    setState(() {
      return app.user = null;
    });
  }

}
4. 구현된 화면
5. 앞으로 구현할 내용
내 정보를 입력하여 회원 관리를 한다.
UI를 좀 더 이쁘게 꾸민다.
옷 중고장터를 구현하기 위해 옷 데이터 관리를 구현한다.
'전공_STUDY > Flutter 어플 개발' 카테고리의 다른 글
| flutter로 중고장터 만들기 main.dart 수정(route 사용) (0) | 2020.06.26 |
|---|---|
| auth.dart 구현 (2) | 2020.05.30 |
| Splash.dart 구현과 main.dart의 코드 정리 (1) | 2020.05.29 |
| Flutter 어플 개발 Sign_up.dart(firebase 연동) (2) | 2020.04.28 |
| Flutter 어플 개발 main.dart 구현 (6) | 2020.04.25 |